There are several techniques and hidden features that immediately may boost our workflow in Sketch. In this series of tips, we will not cover how to use Symbols, Styles, or Smart Layout – I am sure that you already know them!
Let’s dive into surprisingly simple, but powerful tricks that help work faster:
1. Find quickly every Layer, Style or Symbol
Lots of us used to dig through fly-out menus to find specific Symbol or Style. Since Sketch 64, we have got a real search. It not only filters the content but also suggests the best possible result.
Search is available in three inputs: just above the Layer List or Components List and in the Inspector Panel Components Menu. See how it works for Symbols:
… and here is the preview how it works with well designed Typography Scale for Text Styles:

It works so smoothly! Try it out with your UI Library.
2. Drag & Drop Images to Fill the Shape
You do not have to open the fill menu and select “Choose image” to upload it. There is a faster and more convenient way.
Pick the image from macOS Finder and drag it directly into the Fill area of selected Layer in the Inspector Panel (the one on the right). It also works for Symbols and their Overrides.
3. Create Shapes that Adapt
You already know that Symbol instances may nicely adapt its appearance when width and height changes. You surely know that the same effect you may achieve with Groups. But, did you know that it also works for Combined Shapes? It works very well.
4. Change Text Color with Layer Style
This trick works nicely, especially for symbols or groups that represent Tab Bar Items. All you have to do is to combine Icon with Text with Boolean Operation (Union). Now apply the Layer Style to the created Combined Shape. Voila!
By the way, since Sketch 64, you can also use Tint feature for this purpose.
5. Create a Mask with Text
If you want to create a simple mask for color or image, you may simply add Layer Style to the text. However, if you need more complex mask use following instructions.
First, select Text Layer and Layer (or Layers) you want to Mask. Then play with Boolean operations (Subtract, Intersect, or Difference) to achieve the desired result.
6. Multicolor Gradient – Quick Setup
Manipulating gradient with multiple tones may take time. However, there is a handy way to make it quickly and precisely. To place the tone in the specific point, select it, and press the one key from 1 to 9. If you press 3 the color with be placed in 30% of the total gradient width; if you press 5 it will be moved to 50%, and so on.
This technique works for all types of gradients from linear through Radial to Angular. It saves a lot of time!
7. Make Perfect Circle Charts
Circular/Donut charts are very popular. If you want to make them precisely, there is a nice trick! Let’s do this with the following example:
Draw a circle, for example, 200×200 size. Turn off the “Fill” and set up “Border.” Open Border Properties – it is the place where the magic will happen!
First, we need to get the circumference of the circle. The formula is 2πr, where “r” is the radius. The circle with size 200×200 points has got 100 points of a radius. Let’s round off π to 3.14. Let’s make the calculation:
2 * 3.14 * 100 = 628
Now, enter this number into the Gap Field in “Border Properties” section.
What kind of value would you like to see in the donut chart? Let’s make it 56%. Let’s make the calculation:
628 * 0.56 = 351,68
Enter the value into the Dash Field in “Border Properties” pane. That’s it!
Now, You are able to calculate every needed value and have them presented in the chart!
Note: If you change the size (also scale), the chart will start to act inappropriately. You will have to make the calculations again.
8. Work with Tabs instead of Multiple Windows of Sketch
Even if you work on one project, you often have to open multiple sketch files and libraries and switch between them. If you are frustrated by handling multiple windows, there is good news – you may have all files in one Sketch window. To achieve this, you have to activate tabs in Finder. Let me show you how to do this:
- Open macOS System Preferences
- Choose “Dock” option
- Find “Prefer Tabs when opening”…
- Choose “Always” option
- Open Sketch.
- Open menu “View.”
- Select the option “Show Tab bar.”
That’s it! Now every new or opened file will be here in tabs!

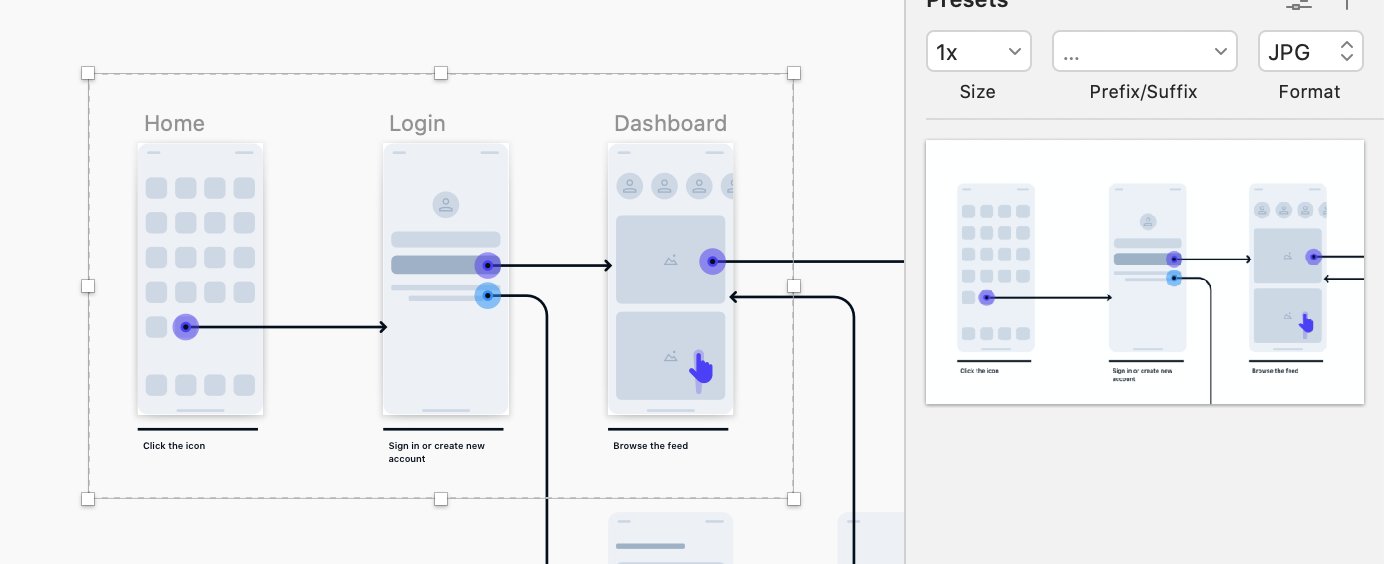
9. Export multiple artboards in as one image.
If you would like to export artboards grouped in a single image (this may be useful for quick user flows presentation), place your artboards on Canvas in a way you want to see them in the image. Create a slice that surrounds all needed artboards. Select needed export options and voila!
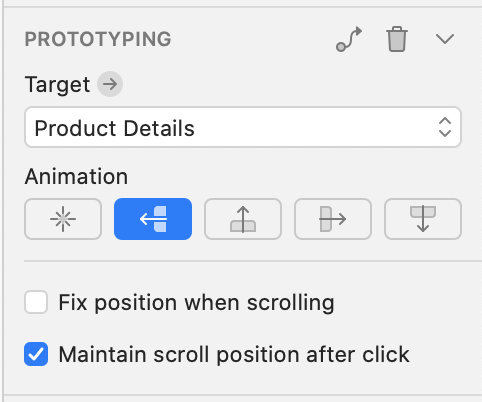
10. Make popup and overlays more natural in prototypes
Since Sketch 65, there is a feature that allows you to have already scrolled elements on different artboards.

To use it, create a prototype that scrolls (for example: with list). Remember that to have scrolling enabled. You have to use the artboard from the preset! This may be any form predefined artboards or the custom one you saved. Start with preset and then adjust its height for scrolling.
Duplicate the artboard and create the popup or overlay.
The feature is placed in the Inspector Panel of the element that moves to the next artboard – it is called “Maintain scroll position after click.”
To conclude
Sketch is a powerful tool, and it is easy to learn. I believe the presented tricks will help your work even faster. Please let me know if you have any other useful tricks that boost your workflow?
By the way…
If you start a new project or would like to organize your UI Library in Figma — do not waste your time creating everything from scratch. Feel free to use the Prime — Design System Kit. It helps you design UI with the best Figma techniques — Component Properties, Variants, Auto Layout and more.See Prime in action.
To make it easier there is a gift 🎁 - Use UXMISFIT10 offer code to get 10% Off.

You can also Create User Flows faster in Figma & Sketch — With SQUID you can create User Flows directly in your favorite design tool. You may style them to your project brand within a couple of clicks. Prepare all kind of diagrams in minutes. See how it works.