So, You are creating or using a Design System with Sketch Libraries. This is great because the system will help you design better quality solutions. However, maintaining and developing the Design System is even more challenging.
Let’s talk about the following important scenario: What to do when your Library becomes too big to manage it easily? You have to know that it’s time to split the components into multiple files and connect Styles and Symbols in those libraries together.
This tutorial describes how to successfully replace all Components (Symbols, Text & Layer Styles) with another Library.
There are 2 major cases where you have to replace the Symbols and Styles with the Library.
- Symbols, Styles, and UI are inside one file, and you want to move included Styles & Symbols to Library
- You already have multiple Libraries for different parts of the Design System. You want to change the existing Library with the other one and replace all connected Symbols & Styles.
To keep things clear: All tips & recommendations are based on my experience. I work a lot with modular Design System Kit I created.
Ok, let’s describe step by step these cases to make it even more practical:
1. Exporting Symbols & Styles To Library
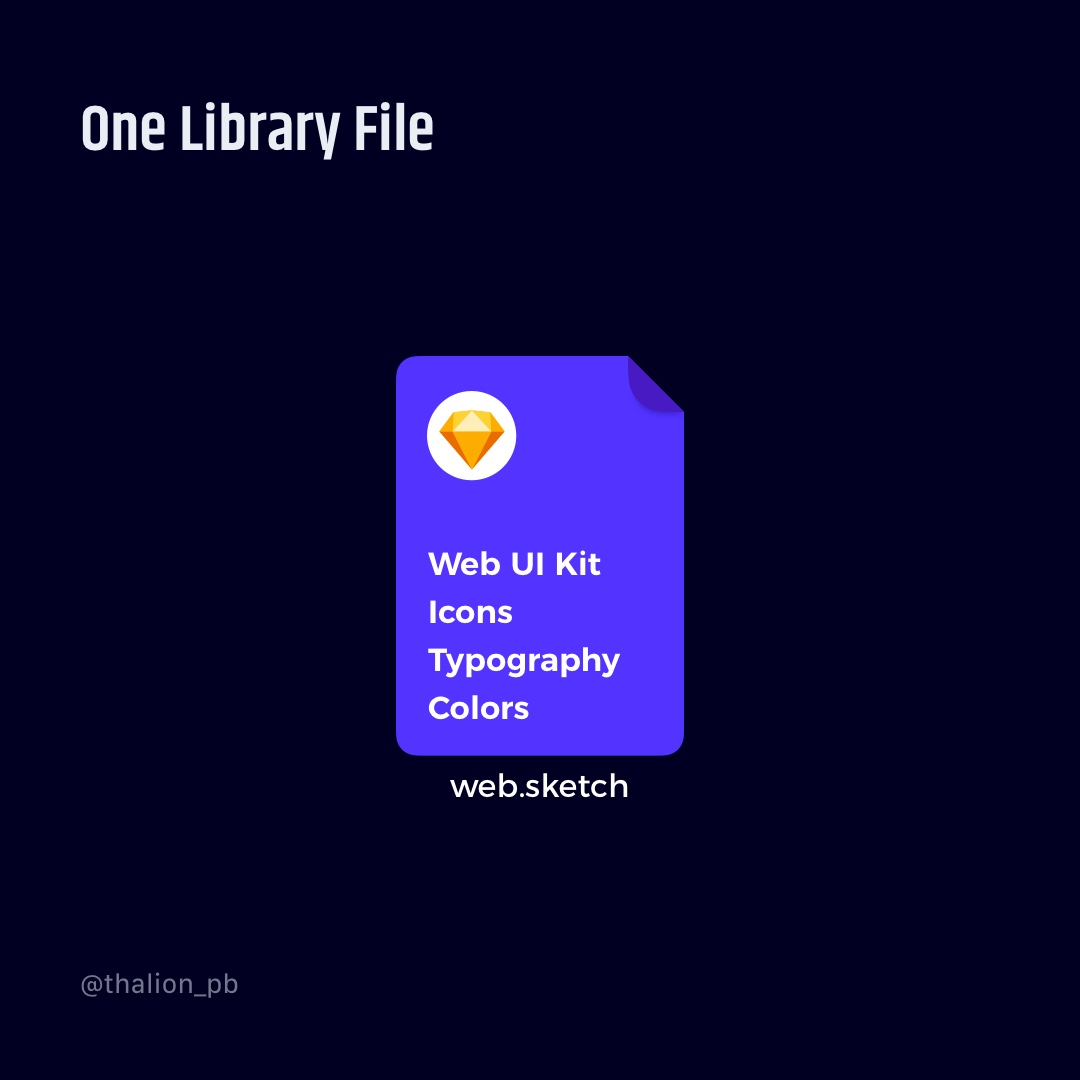
Let’s assume that your projects entire UI Library is in one file. I will name it “web.sketch”.
Now, imagine that your project is becoming more complex (new platform added?), or you want to share the appearance defined in Symbols and Styles with other designers to work more efficiently.
The best what you can do is to separate basic components like colors, typography, and possibly icons to another file (or even files if the project’s design system becomes huge).
Making this manually does not make sense because you would have to connect all styles to the library’s styles again. This could take hours. Fortunately, there are some plugins for that:
- Camilo – recommended!
- Sketch Automate
- Move to Library
Camilo – successful workflow to move local Symbols, Layer & Text Styles to Library is following.
- Create File “the core.sketch”
- Make “the core.sketch” Sketch Library
- Select All Symbols & Styles from “web.sketch” and copy them
- paste them into “the core.sketch”
- run Camilo – select “the core.sketch” and confirm by clicking “Switch”
- Voila!
At first, this may seem strange because you are manually copying Styles and Symbols to the library. But, they are not attached to “web.sketch.” Camilo plugin replaces local styles with the library’s. It’s simple and makes all the needed changes.
Sketch Automate the workflow is similar to Camilo. You have to create “the core.sketch” file and make it a Sketch Library. Copy & Paster all Symbols and Styles to “the core.sketch.” Now perform the instructions from below.
Choose Automate > Library > Replace Library and proceed:
- Change Local Symbols to Library Symbol
- Change Local Text Styles to Library Symbols
- Change Local Layer Styles to Library Symbols
Sketch Automate takes a few steps more to perform but also works well.
Move to Library – the plugin exports only Symbols to the Library. If you have Layer or Text Styles that are not connected to any Symbol, they will stay inside the “project.sketch” file.
How to copy Layer & Text Styles to a different file?
You may wonder how to copy Styles to another file. It is easy if you have got a style guide that demonstrates all of them. Just select the style guide components with styles and copy them to the desired file.
If you do not have this type of style guide, you can still do it. Go to the left panel in Sketch and change tab from “Layers” to “Components.” Now, select all needed styles like layers, right-click, and copy them. When you open the destination file, just press “Cmd+v” this will paste styles (and create some automatic default layers that you may delete on your own). That’s it!
2. Replacing Libraries
Let’s visualise hypothetical structure:
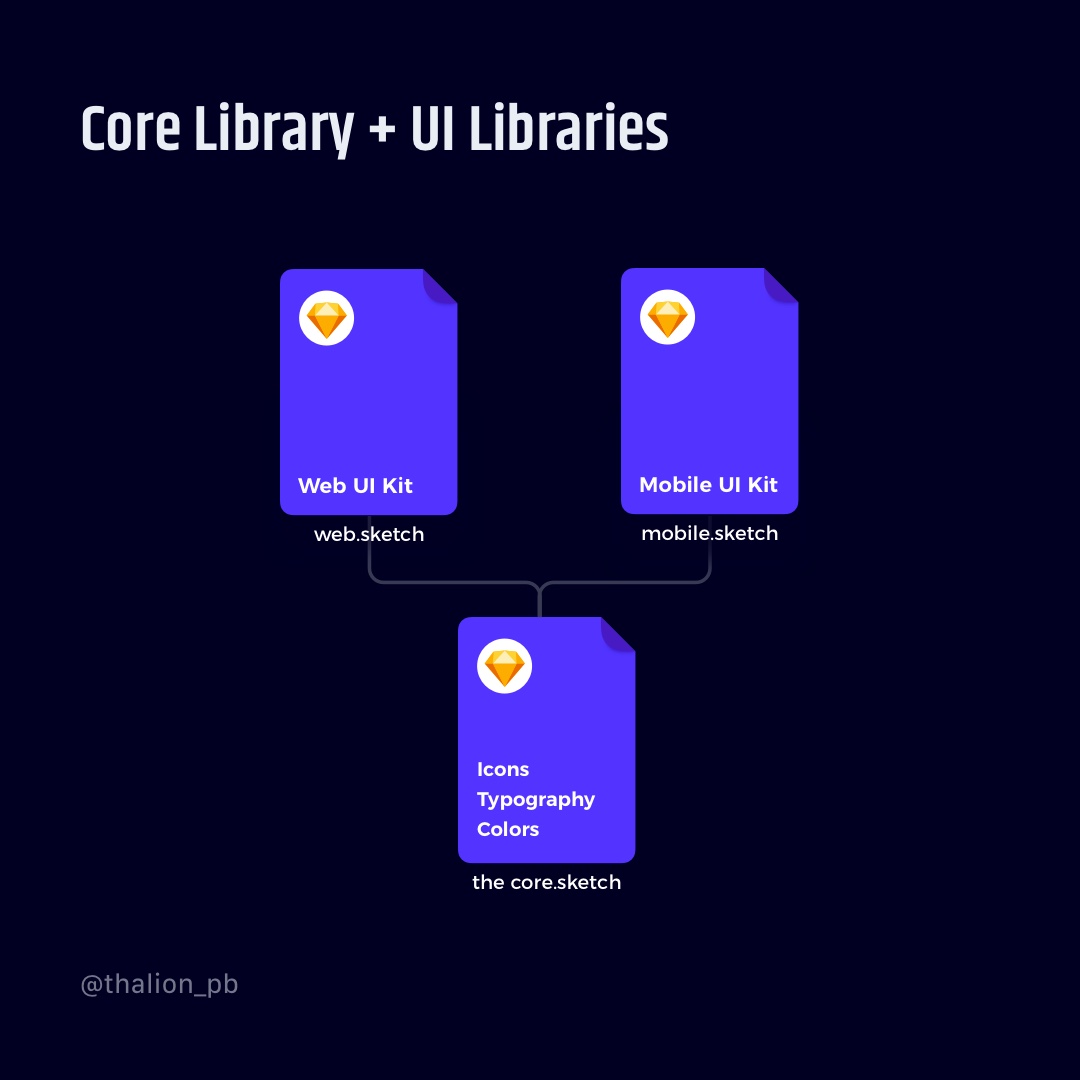
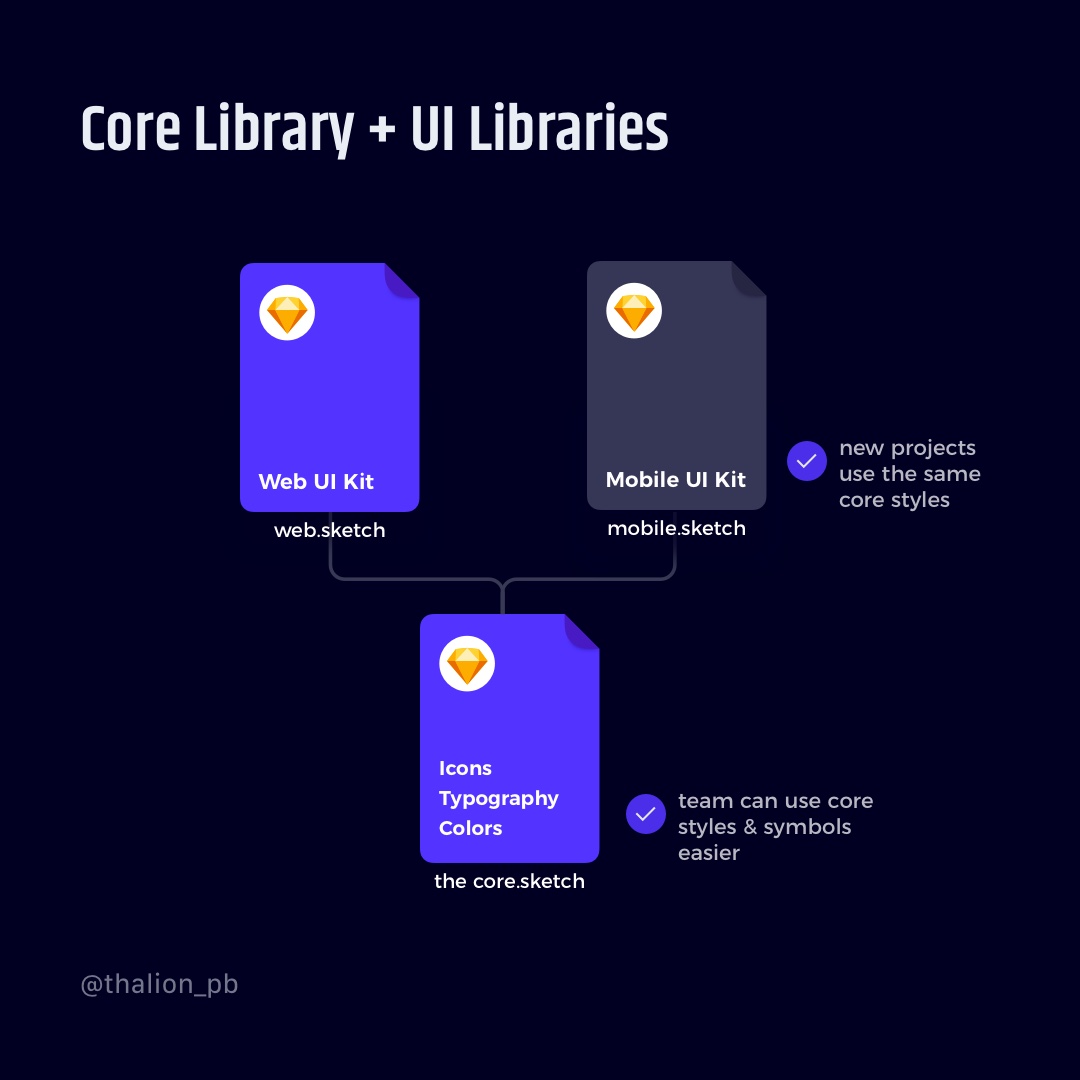
Both Web and Mobile libraries use the core file. It includes colors, typography, and possibly icons. Because of changing requirements, you would like to separate the core for mobile and web to have the following structure:
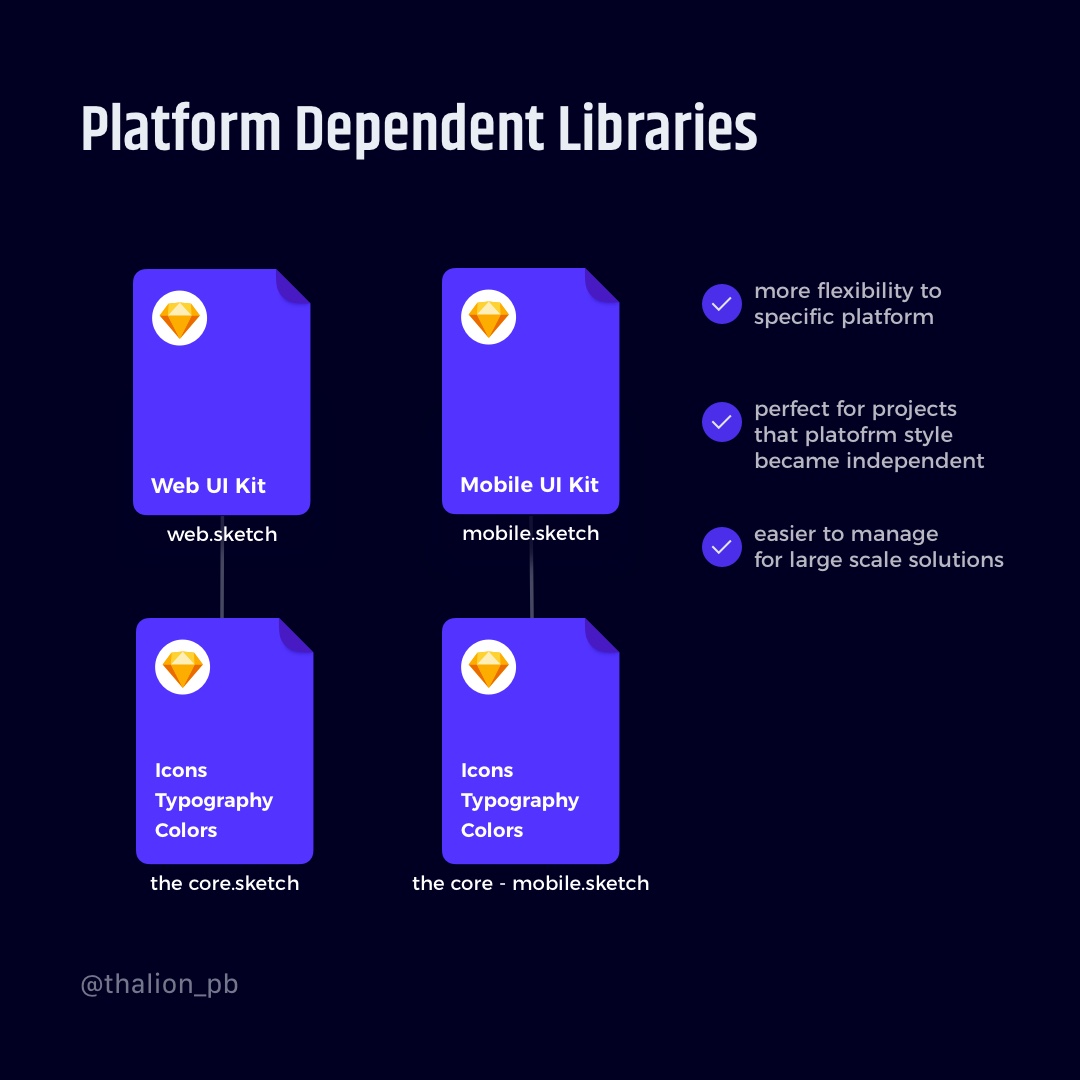
Natively Sketch recognizes Libraries from their file names, “the core – mobile.sketch”. This means that it will not attach to “mobile.sketch” automatically, even if it includes styles and symbols with identical names.
To switch the core library of mobile.sketch to “the core – mobile.sketch” quickly, you have to use a plugin.
There are 3 well known plugins that may do the job:
- Camilo – recommended!
- Sketch Automate
- Library Replacer
Camilo is extremely simple to use. Just run the plugin, when the file that changes the library is selected, and choose the library that will be attached.
In our case, this will be the following steps:
- Open mobile.sketch
- Run “Camilo”
- Select “the core – mobile.sketch”
- Confirm changes by clicking “switch” and wait a few seconds
- Voila!
Camilo is super simple to use and works very precisely.

Sketch Automate if you would like to use the plugin, replace Library in the order presented below:
Choose Automate > Library > Replace Library and proceed:
- Replace Symbols
- Replace Text Styles
- Replace Layer Styles
Library Replacer is also a nice plugin, but from my experience, it does not replace Styles of more complex components (for example Symbols nested within Symbols). If your library contains more complex symbols, I do not recommend using this plugin.
If your project is enough big… your Libraries may scale into various files:
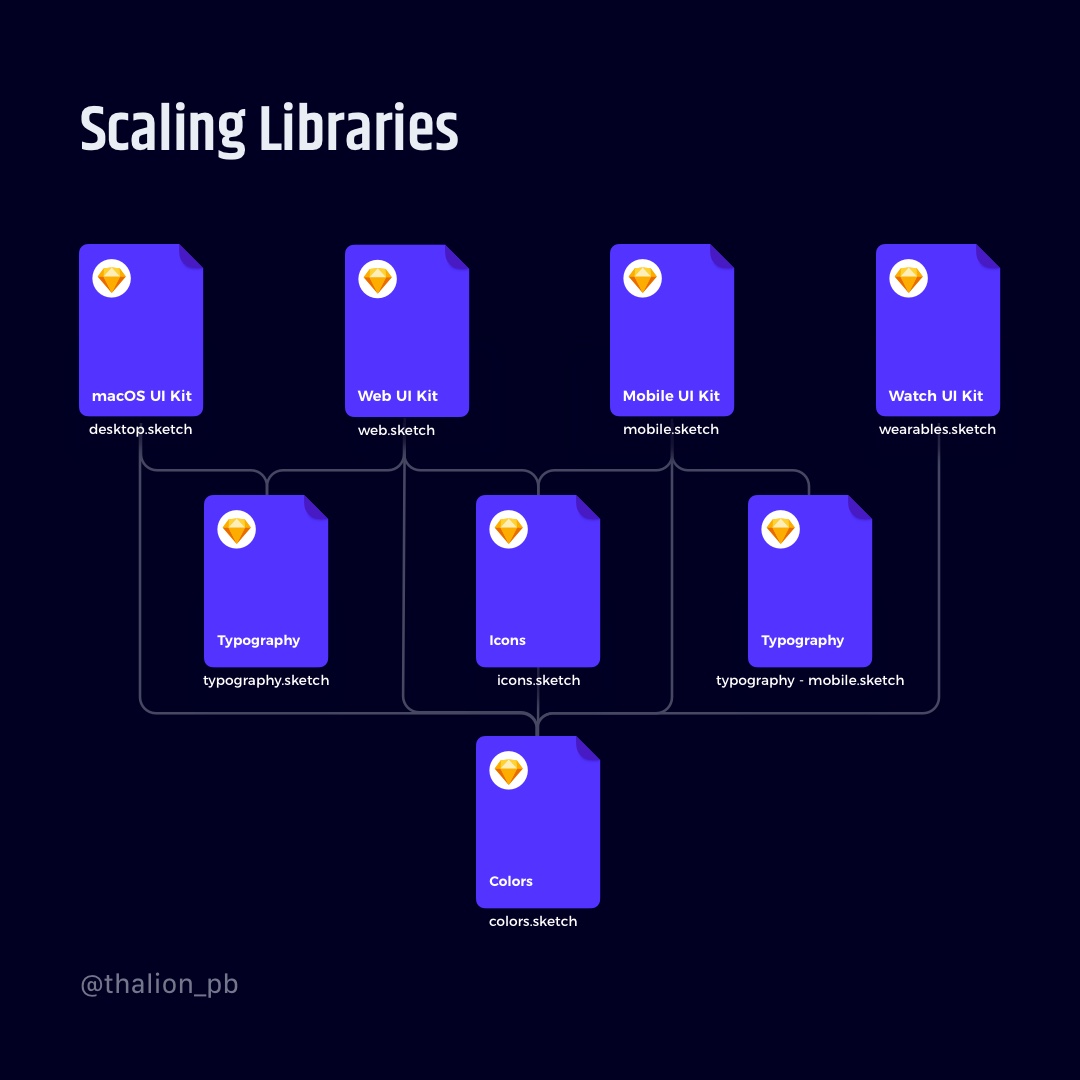
Need a sample of Modular Libraries for Design System?
If you never had a chance to work with multiple Libraries connected together, here is the quick solution to start:
As I mentioned at the beginning of the tutorial – all these recommendations are based on my experience with working on modular Design System Libraries. I created a special kit to help designers work faster in their projects.
Prime Design System Kit includes 6 Sketch Libraries, and the majority of them are connected to work seamlessly with Mobile, Web, and Data Visualization.
The kit’s components separated into files by their purpose:
- The Core (colors, typography, icons, basic shapes),
- Web (Desktop & Mobile Web UI Components and Templates),
- Mobile (Native iOS and Android UI Components and Templates),
- Charts (all major types of data visualization),
- Devices (Vector Device Templates),
- Illustrations (the kit for customizing and preparing illustrations).
“The Core” Library is connected to Web, Mobile, and Charts File.
Believe me, I had a lot of fun making those libraries to work together! 😉
By the way
I know that the sample may be useful for creating your own set of libraries… or maybe you would like to use ready to use the well-structured kit to boost your workflow?
Feel free to use the mentioned Prime — Design System Kit. It helps you design UI with the best Sketch techniques — Smart Layout, Symbol Overrides, and more.
To make it easier, there is a gift 🎁 Use UXMISFIT10 offer code to get 10% Off.

To sum up
Replacing Symbols and Styles may seem to be complicated operations, but well planned, it takes just a few clicks. As you may notice, Camilo plugin was successfully used in both cases, so you should definitely try it out!
Thanks for reading!